Let’s learn how to measure resistance using a voltmeter and ammeter in a simple circuit setup. You’ll study step-by-step instructions, understand the application of Ohm’s Law, and gain valuable insight into accurate resistance measurements.
वोल्टमीटर और अमीटर की सहायता से प्रतिरोध मापन प्रैक्टिकल
उद्देश्य: (Aim)
इस प्रैक्टिकल में हम एक श्रृंखला सर्किट में वोल्टमीटर और एमीटर का उपयोग करके ओम के नियम के अनुप्रयोग के माध्यम से किसी दिए गए अवरोधक के प्रतिरोध को मापना सीखेंगे , जिससे विद्युत माप में व्यावहारिक कौशल को बढ़ाया जा सके और बुनियादी सर्किट सिद्धांतों की समझ को मजबूत किया जा सके।
आवश्यक सामग्री (Materials Required)
| Tools | Quantity |
|---|---|
| Insulated Combination Pliers | 01 |
| Insulated Screw Driver | 01 |
| Ammeter 0-1 Amp MI Type | 01 |
| Voltmeter 0-300V MI Type | 01 |
| Resistance 200 Ohm | 01 |
| PVC Wire 1.5mm2 | 03 Meter |
| Single Way Switch 6A, 250V | 01 |
| Insulated Tape PVC | 01 Role |
| Battery | 01 |
कार्य विधि (Working Method)
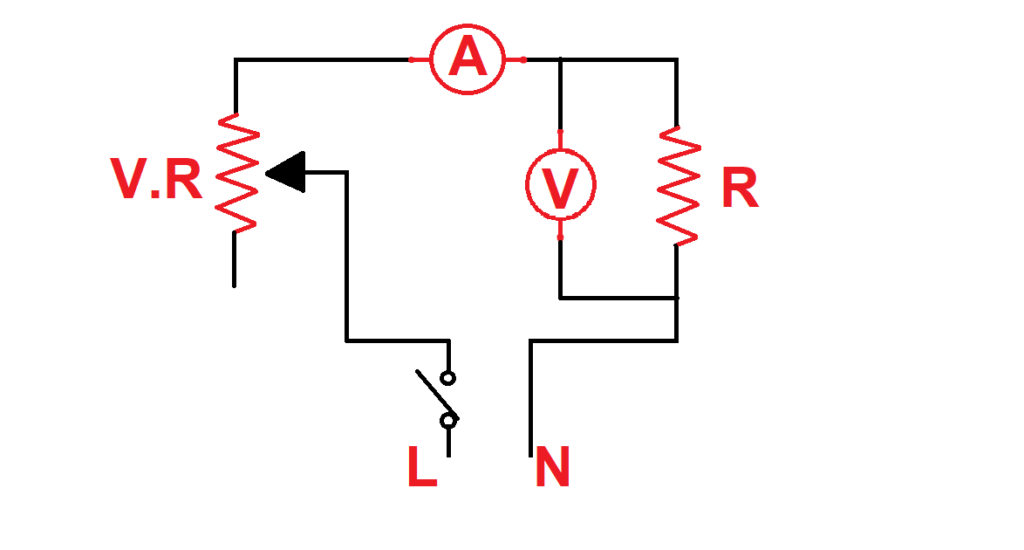
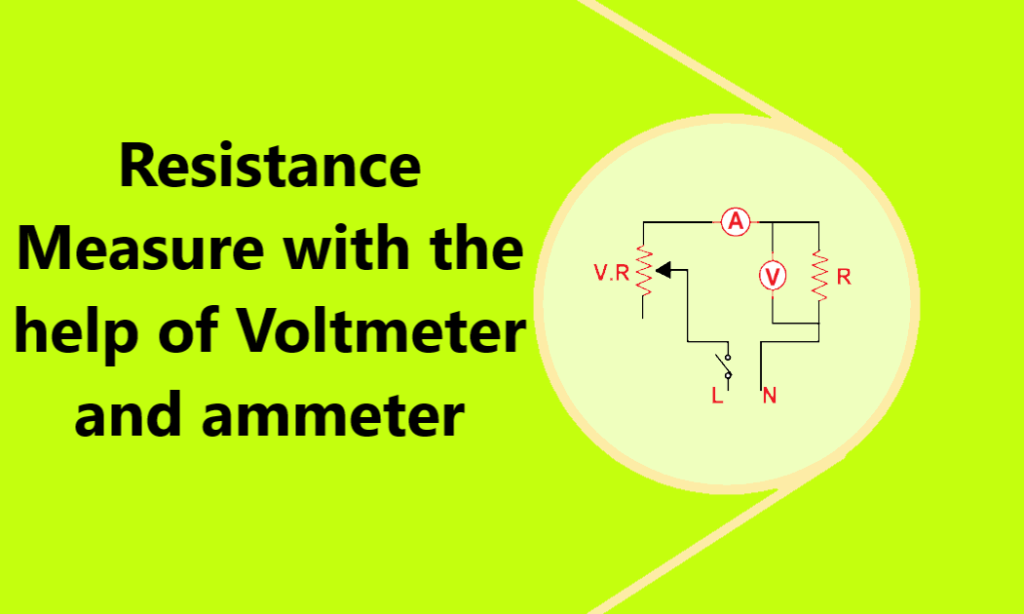
सर्किट सेट करें (Set Up the Circuit:) :-अवरोधक को एमीटर के साथ श्रृंखला में कनेक्ट करें। यह सुनिश्चित करे कि एमीटर अवरोधक से गुजरने वाली धारा को मापे वोल्टमीटर को प्रतिरोधक के समानांतर कनेक्ट करें। यह व्यवस्था वोल्टमीटर को प्रतिरोधक पर वोल्टेज मापने के प्रयोग में आता है।
बिजली चालू करें(Turn On the Power) :- सर्किट को उपयुक्त बिजली स्रोत (जैसे, बैटरी) से जोड़कर बिजली चालू करें।
एमीटर रीडिंग को रिकॉर्ड करे (Record the ammeter reading) :-एमीटर द्वारा मापी गई धारा (I) को पढ़ें और रिकॉर्ड करें। सुनिश्चित करें कि एमीटर इसके माध्यम से बहने वाली धारा को सटीक रूप से मापने के लिए अवरोधक के साथ श्रृंखला में जुड़ा हुआ है।
वोल्टमीटर रीडिंग रिकॉर्ड करें (Record the voltmeter reading) :-वोल्टमीटर द्वारा मापे गए वोल्टेज (V) को पढ़ें और रिकॉर्ड करें। वोल्टमीटर को प्रतिरोधक के पार वोल्टेज मापने के लिए उसके समानांतर जोड़ा जाना चाहिए।
प्रतिरोध की गणना करें (Calculate Resistance) :-सूत्र का उपयोग करके प्रतिरोधक के प्रतिरोध (R) की गणना करने के लिए ओम के नियम का उपयोग करें
R=V/I
जहां R प्रतिरोध है, V वोल्टेज है, और I करंट है।
सटीकता के लिए दोहराएँ (Repeat for Accuracy) :-सटीकता सुनिश्चित करने के लिए उपरोक्त चरणों को कई बार दोहराएं। रिकॉर्ड किए गए प्रतिरोध मानों का औसत लें।
सुरक्षा सावधानियां (safety precautions:)
- रीडिंग में त्रुटियों से बचने के लिए उचित कनेक्शन सुनिश्चित करें।
- माप के लिए उपयुक्त इकाइयों (वोल्ट, एम्पीयर, ओम) का उपयोग करें।
- ध्यान रखें कि सर्किट को ओवरलोड न करें, और अवरोधक के लिए उपयुक्त वोल्टेज वाले पावर स्रोत का उपयोग करें।
निष्कर्ष (Conclusion)
यह व्यावहारिक अभ्यास बुनियादी विद्युत उपकरणों का उपयोग करके प्रतिरोध को मापने में व्यावहारिक अनुभव प्रदान किया। यह ओम के नियम के अनुप्रयोग को सुदृढ़ करता है और सटीक प्रतिरोध माप के लिए सर्किट में वोल्टमीटर और एमीटर का उपयोग करने की समझ को बढ़ाता है।
- Resistance Measure with the help of Voltmeter and ammeter
 Let’s learn how to measure resistance using a voltmeter and ammeter in a simple circuit setup. You’ll study step-by-step instructions, understand the application of Ohm’s Law, and gain valuable insight into accurate resistance measurements. वोल्टमीटर और अमीटर की सहायता से प्रतिरोध मापन प्रैक्टिकल उद्देश्य: (Aim) इस प्रैक्टिकल में हम एक श्रृंखला सर्किट में वोल्टमीटर और … Read more
 - Transistor terminals Practical using a MultimeterExplore the world of transistors with our practical guide on testing transistor nature and terminals using a multimeter. Learn the essential steps, tools, and safety precautions for accurate measurements. Gain hands-on experience to identify NPN or PNP transistors and assess terminal functionality. Elevate your electronics skills with this comprehensive tutorial for students and enthusiasts alike.” … Read more
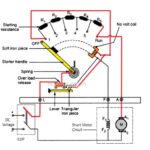
- DC Shunt Motor Starting and Reversing: A Comprehensive Step-by-Step PracticalStarting and reversing a DC shunt motor using a DC 3-point starter in this comprehensive and safety-focused practical guide. step-by-step teaching for operation Aim (उद्देश्य ) इस प्रैक्टिकल का उद्देश्य डीसी 3-पॉइंट स्टार्टर का उपयोग करके डीसी शंट मोटर को शुरू करने और इसके रोटेशन की दिशा को उलटने की उचित प्रक्रिया का प्रदर्शन करना … Read more
- Practical of Determining the Electrical Conductivity of a Cableउद्देश्य: इस व्यावहारिक प्रयोग का उद्देश्य एक साधारण सेटअप का उपयोग करके केबल की विद्युत चालकता को मापना और विभिन्न अनुप्रयोगों के लिए इसकी उपयुक्तता निर्धारित करना है। सामग्री: परीक्षणाधीन केबलविद्युत आपूर्ति (डीसी)डिज़िटल मल्टीमीटरक्रोकोडाइल क्लिपतार जोड़नारजिस्टर (वैकल्पिक, अंशांकन के लिए) प्रक्रिया: स्थापित करना: अंशांकन (वैकल्पिक): मापनः गणना: विश्लेषण: प्राप्त चालकता मान की तुलना समान अनुप्रयोगों … Read more
- ITI Practical: Measuring Wire and Cable Dia With Micrometer Gauge
 Micrometers are a very Important measuring tool for ITI candidates for ITI Practical Examination, In this practical, we will study the correct method of measuring the diameter of different types of wires and cables with the help of a micrometer (screw gauge) and understand its measurement with formula and through a chart. Table of Content … Read more